

It may not be super springy here just yet but that doesn’t mean we can’t start making super fun and adorable spring decor right? I thought instead of doing just a regular painted sign we’d change it up a bit and make our very own D.I.Y faux wood sign! This is going to be a ton of fun and you really can customize this into any look you want!
This sign also makes the perfect gift for any family member with spring birthdays and because we get us sponges to paint, this project is perfect for your little ones too! Grab your paints and your creativity and let’s make this adorable spring sign!
I have linked to some products for your reference and convenience Some of the links are affiliate links, which means we may receive a small commission if you choose to use those links to purchase the product. These are products I personally used to create these DIY projects and would never share anything with you if I hadn’t tried it and loved it!
Materials:
CANVAS PANELS 12 PACK – 9″X12″ SUPER VALUE PACK Artist Canvas Panel Boards for Painting >>Canvas Board – You can purchase these at Micheals or Amazon, they’re both pretty inexpensive and usually come in a value pack. I prefer the canvas boards over a regular canvas because it mimics wood a bit better!
Darice Assorted Sponge Package >>Household Sponge – Any old sponge will do just make sure it’s clean of any debris or food particles!
Apple Barrel Acrylic Paint Set, 18 Piece (2-Ounce), PROMOABI Best Selling Colors I>>Assorted colors of Acrylic Paints – We’re grabbing the acrylics again today because they’re inexpensive and super forgiving! You can choose to use any colors you prefer but if you like the effect shown above you use these colors.
Cotton ball & Q-tips– These are used to add a cute touch!
Mont Marte Gallery Series Acrylic Brush Set, 5 Piece. Selection of Synthetic Hair Paint Brushes Suitable for Acrylic Painting >>Paintbrush
– If you don’t have one you can use your fingers or your sponge either will work just fine for this part!
Bunny Stencil– I’m going to show you how you can make your own stencils for the silhouette but you can just simply google a copyright free image of a bunny silhouette on google!
KINGLAKE 328 Feet Natural Jute Twine Best Arts Crafts Gift Twine Christmas Twine Industrial Packing Materials Durable String for Gardening Applications >>Twine
– This is just used to hang your sign once you’re done but you can use whatever you want to hang it!
Directions:
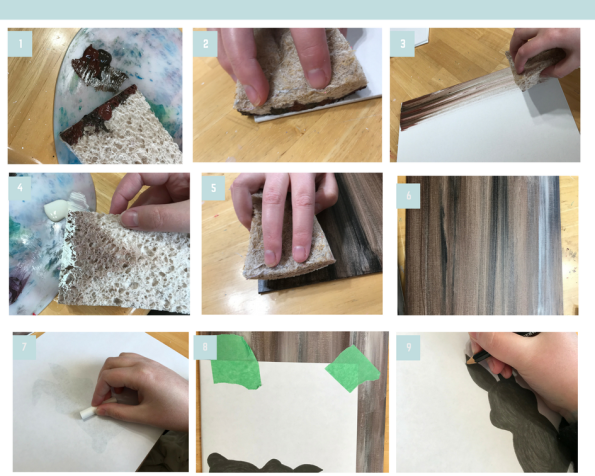
1. The ground layer of paint: First begin by setting out your white, brown and black paints. Cover the edge of your sponge with the brown paint and pull it across your canvas. Press hard enough to ensure the paint covers the canvas but its’ okay if a bit of canvas shows through. Go back and forth pulling towards you with the sponge up and down the entire canvas. Let the paint dry.
2. Paint the back of the canvas: Next, I recommend painting the back. I have found that sometimes these canvases can tend to bend and warp. I’ve found that by painting the back of the canvas they don’t warp or bend. I put a thin layer or back on the back. Another solution is to put the canvas in the frame and take the glass out. Either way works well!
3. Adding the first layer of paint: Next load your sponge with the white paint. Make sure to cover the edge with white paint and then on each corner grab a small amount of black paint. Pull the sponge towards you on the canvas pressing hard enough to cover.
4. Distressing the “wood”: Continue adding the white paint onto the sponge and lightly going over the areas you want to look more weathered. This is how we get an older wooden look. I used my fingers a bit and just played around with different areas! If there are any spots of canvas showing, just go back over it with your sponge!
6. Extra Paint: Next, I like to add just a few lines to make it look even more like imperfect wood. You can choose to add more white, more brown or more black where you think it needs it!
7. Bunny Silhouette: Print off a picture of a bunny silhouette. I just looked for a royalty-free image on google! On the back of the paper only where the silhouette is, rub the kid’s chalk all over it. This will help you transfer the image to the canvas!
8. Place the Silhouette on the canvas: Tape the silhouette chalk side down onto the canvas. The tape with preventing it from moving around while you’re tracing.
9. Trace the Silhouette: Using a pencil, trace around the bunny. The chalk that we put on the back will transfer the image to the canvas!
10. Paint in the bunny: Remove the paper from the canvas and grab your paint brush and any color you want! Paint the entire bunny while following the chalk tracing you created. There you have it, a bunny silhouette! Of course, you can use blue, green, pink, yellow, whatever color paint you want for the bunny, it’s your sign!
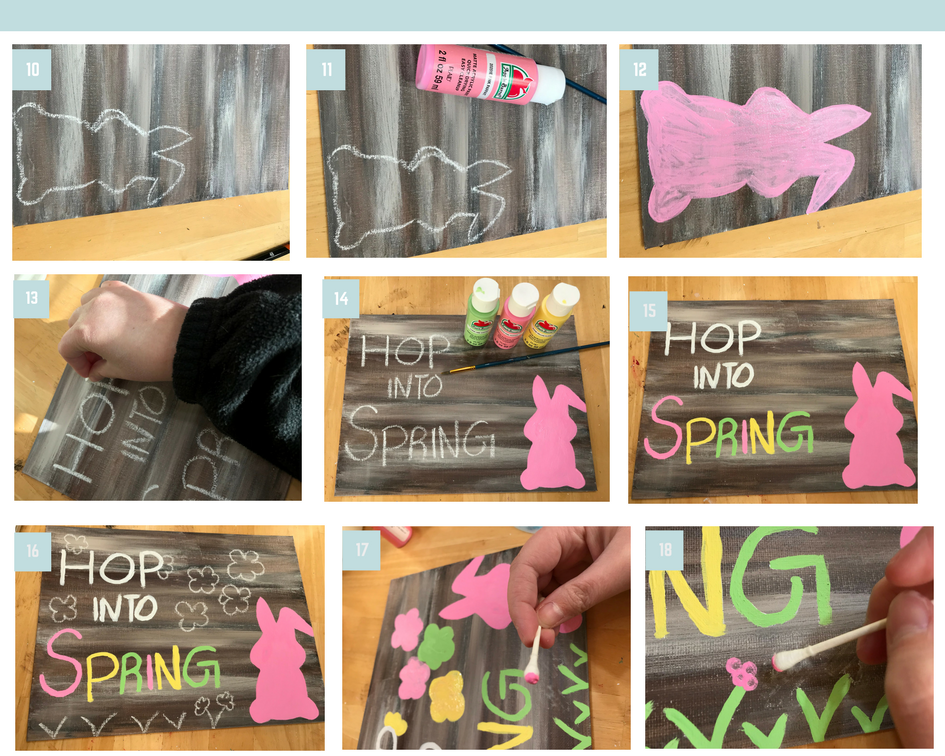
11. Use chalk to write out “Hop into Spring”! You now can add flowers, another silhouette or other designs you want to your sign to really make it your own! I added some grass on the bottom and used Q-tips to dab some flowers onto the grass! This is just a fun touch to add more color!
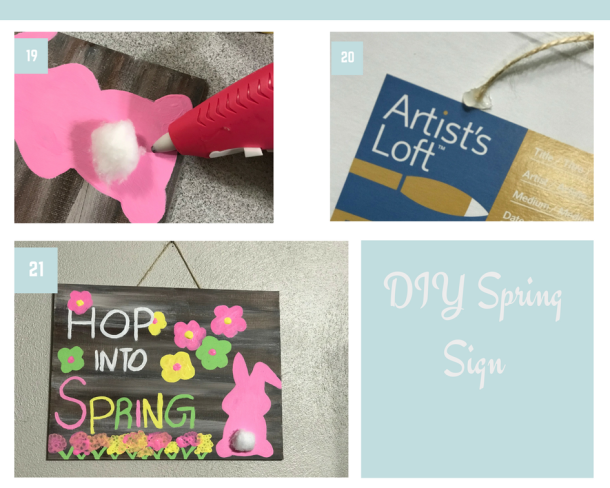
12. Glue on the cottontail! Once I glued on the cotton ball, I fluffed it up a bit so it looked even more like a fluffy bunny tail!
12. Glue the twine to the back: Using a hot glue gun simply glue the twine to the back of your canvas sign and hang it up for all to see! Depending on how heavy your sign is, you have to add a bit of extra twine like I did.
I hope you enjoyed creating this super fun, simple and festive spring sign! I cannot wait to hear if you made these signs and how you enjoyed them! If you make these signs feel free to tag us @twocraftygalsblog so we can see them!
Remember to spread the love and share with all of your friends!! Hoppy Spring!!


This is so festive! So smart using the Q-tip to paint!
LikeLike
Thank you Jen! It is fun to use different items to paint projects:)
LikeLike
That is such an adorable little craft idea!
LikeLike
Thank you! It was so fun to make something with spring in mind:)
LikeLike
So cute! I think my son would love this. Feeling crafty now!
LikeLiked by 1 person
This project is so much fun to do with family and it’s simple to do as well!
LikeLike
Great craft idea! I never thought to use a Q-Tip – genius!
LikeLiked by 1 person
Thank you, Amanda! Q-tips are perfect for so many fun techniques in painting and just like sponges, we have them laying around the house, so why not use them!
LikeLike
These are so adorable! I always wanted to decorate my house for every holiday but realized I’m not that crafty. This looks really easy, though.
LikeLiked by 1 person
You can definitely do this project! It’s simple to do and you don’t need a ton of things to get it done!
LikeLike
Looks like a fun and easy enough craft to make. Could even get the kids involved.
LikeLiked by 1 person
Yes absolutely! This would be a blast to do with your kids on a rainy day or any day!
LikeLike
Your painted wood looks very realistic, I thought it was real until I read the how-to. Nice job!
LikeLiked by 1 person
Thank you so much! This technique is so much fun to do and simple once you get the hang of it!
LikeLike
How neat! I had no idea you could make ‘faux wood’ like that.
LikeLiked by 1 person
Thank you, Jordan! This faux wood technique can even be used on furniture or pretty much anything else you want to paint around the house!
LikeLike
This is great!! I bet I could totally make this with my girlies!
LikeLike
Thanks, Toni! Yeah, absolutely! This craft is a blast to do as a family! Have fun!
LikeLike